Wednesday 16 December 2015

Franznap and French artillery limbers

It is often a dilemma as to whether to use artillery limbers or leave them from the battlefield. Bearing in mind the space used by a battery and that the depth was often greater than the width it seems logical that limbers ought to be a feature, even if just to make the game look more realistic. The reluctance is often based on the fact that it can clutter up the table and also the tedium in painting so many horses etc. But I decided to buy some Franznap 20mm French artillery limbers with some engineers wagons as well. 6 horses for the foot batteries and just 4 for the horse artillery. The width of each, if placed sideways behind the battery, fits nicely to the 3 gun batteries for foot and the 2 gun batteries for horse. Some of the limbers have no riders so I can place Guard/Polish or Saxon riders (detachable) as needed. Admittedly the Bavarian limber won't be the correct shade of duck blue but that can't be helped.

The engineer riders have been painted with dark brown trousers and blue jackets like the others. I believe the engineers had greyer coats earlier in the period….pre 1810 say. Not 100% sure on this.

Franznap produces very fine and detailed miniatures. The rope cabling was particularly fragile and gluing these prior to painting was a painful experience. A couple broke with the minimum of bending into place so reluctantly I have had to leave many of the linking ropes dangling into thin air. Putting them precisely where they ought to be will be a bridge too far for the pewter to withstand. Definitely better viewed from a distance!

I am sure there is a way of fixing this correctly but I just don't have the patience or the skill.

The sculpting of the figures (getting on the horse and twisting round figures) are particularly good.

They look pretty ok though. I'm not in the same league as some professional miniature painters and never will be...Art Miniaturen will be providing the Austrian, Prussian and Russian limbers in due course. Will be interesting to see how they compare. Franznap vs Art Miniaturen.


Thursday 10 December 2015

15mm Napoleonic game

Last weekend we were lucky enough to be hosted by Rob in Ealing in west London for a game in his custom built "war room". Myself and Alan were given the French, Phil and Brian took control of the Prussians while Rob and Noel had the British.

Phil has an impressive 10,000 strong collection of 15mm Napoleonics and another 10,000 unpainted.

The French were given the middle of the table and the Allies were to attack from either side. A classic ham sandwich. The French decided to defend their left flank against the British, using the 3 reserve foot batteries to help, and attack the Prussians with 2/3rds of their force, including all the heavy cavalry, on the right flank. The Old Guard infantry and Guard cavalry would sit in the middle as a reserve but the Young Guard would be detached to assist in the assault on the Prussians.

Using a version of the Shako rules it was not made particularly clear by the umpire (who was wearing the additional hat of the British!!) how the initiative rule would be implemented. The French won the initiative and allowed the Allies to move first, the French playing last. But this state of affairs was to be repeated every move and so the Allies gained +1 in every melee for the whole game. Hmm….had we known!

The French attack the Prussians: (A French dragoon division of 8 regts held up well against the Prussian cavalry but were to end up being wiped out until French heavy cavalry was diverted to assist from the northern flank)


The French infantry assault in the centre initially did well but foundered in the wood. The French division in the foreground lost one unit and failed a subsequent morale test which sent the whole division packing. Fresh units never fired a shot! This was where the French should be winning….


The French Guard cavalry, HA and 4 battalions of Old Guard with two foot batteries sat patiently in the middle waiting to see where and when they might be best employed.


The British attack on the french left was speared headed by average troops which was perhaps their undoing. The French deployed a strong defensive position using the wood, hills and village to maximum effect. Breaking this down would never be an easy task.


Four French foot batteries occupied the middle ground, persuading the British to focus their attacks on the flanks.


Close up of the French Guard reserve:


The French left flank vs the Brits:


The French right flank vs the Prussians:


In the end the French finally broke the Prussians but this was only achieved late into the game. This allowed most of the French heavy cavalry and one division of infantry to move back across the table to assist the effort against the British. Only the cavalry would actually get their in time to make a difference. 

The French Guard cavalry were deployed to assist the southern flank against the British. The Old Guard infantry and two foot batteries were sent north against the British also, just as a French infantry division was about to crumble. 

The British attack in the south made heavy weather of driving the French light infantry out of the wood and one British division of average troops were routed in a similar fashion to the unfortunate French infantry division against the Prussians. One down and the rest fled. Just as the British were making gains in the north, they came up against the French Old Guard infantry and artillery which managed to send another British division back to the rear. 

Overall a French victory. Had the British led with their best troops it might well have been a different story. Equally, had the French known about the initiative effects clearly, the same could be said.

Great fun and Rob's gaming room is an excellent venue. 

Wednesday 2 December 2015

New additions from Art Miniaturen

Excellent news from the team at Art Miniaturen. They have recently released some Austrian Dragoons which could just as easily be painted as Austrian Cheveuxleger as this latter group had both green or white jackets. 12 different poses.

There are also some other odds and ends including Polish aide de camp and Bavarian sappers. Take a look at their website for more information.


Monday 19 October 2015

Austrians and Russians vs French and Poles. 1813

The great thing about a large table (in this instance 17 x 6) with not too many troops, is that it allows for manoeuvre. Too many games tend to pack as many men onto a board and the whole affair ends up being a bloodbath. Not all battles were like Borodino but even that battle had some degree of manoeuvre (illustrated with either Davout's suggestion of a right flanking or Platov's jolly into the French rear as it were)

This time the French were outnumbered and defending two key areas, the farm and the village. The Allies had to either defeat the French (majority of units either routed or in retreat) or take both objectives. The French deployment was pre-set and could not be altered while the Allies could swop 2 brigades and move one. This they did. All cavalry was moved to the flanks (with none in the centre) so leaving the task of taking the farm to the Hungarian line brigade and a Hungarian grenadier brigade while the Russians had to take the village. The Russian left flank had an impressive mixture of cavalry and horse artillery. One Russian Guard regt (red), the Soum Hussars (grey), 2 regts of Dragoons (Pink and orange….can't remember which regts these were supposed to be), three regts of Cossacks (Don plus 2 irregular), the Pavlograd Hussars (turquoise/green) and the Grodno Hussars (dark blue) and 2 regts of Loubny Hussars.(blue)

The French left the task of defending the farm to two Polish brigades supported by a brigade of Hussars/Chasseurs. Two heavy cavalry brigades sat in the centre with two batteries of HA. The village was defended by the Middle Guard brigade, and the right flank ridge line was defended by the Young Guard brigade with a brigade of dragoons in support on the extreme flank. An Old Guard brigade was in reserve. The French had one fewer brigade, 5 regts of cavalry less and three batteries less that the Allies but had better quality troops.


2 Brigades of French heavy cavalry lie in wait. (Art Miniaturen)

The Old Guard Grenadiers in reserve. (Jorg Schilling figures)


Austro-Hungarian grenadiers ready to assault the farm. (Art Miniaturen) the ammo wagon is plastic but riders are metal from Art M

Russian cavalry on the Russian left flank begin their encirclement. (cavalry are Art M but Russian infantry are Newline designs)


 Grodno (front) and Pavolgrad Hussars. (Art M) go the long way round, trying to evade skirmishers hidden in the wood.


Russian Dragoons.

Austrian heavy cavalry in the foreground with supporting HA. Note the horse artillery ammo adjacent to the cavalry is courtesy of Franznap figures. Hungarian infantry beyond (Art M)


Austrian artillery (Art M)

An ADC moves up to inform the Austrian cavalry commander to commence his right flanking manoeuvre. Note the four artillery piles of roundshot. Each HA and FT battery of the Allies had four rounds of effective fire (while the French foot batteries had five, illustrating the extra time the French had in preparing their defensive position.)


Austro-Hungarian skirmishers approach the outskirts of the farm, while the cavalry go round the largely undefended flank. Polish skirmishers in the wood did cause two disorder casualties on both the lead regts but a score of 7 on the 1D8 for the brigade test ensured that the Austrian cavalry successfully squeezed through this awkward bottle neck.


 While the main body assaults the farm…


The French 1st and 2nd Hussars (Art M) move up to try and halt the Austrian infantry advance. The 4th Chasseurs (plastic converted Revell/Italeri) are also just visible.


The Poles (Newline) sit and wait and deploy their own skirmishers. A French light battalion occupies the wood (barely visible)

 The French had an option. Either defend and take the punishment once the Allied artillery had mounted the central hill and commenced bombarding the village or go on the attack and seize this key ground before the Russians could deploy. Now that the Russians had no cavalry cover in the centre this  latter option became a reality. 


The two French heavy cavalry brigades move towards the central hill to stop the Russian advance.


The French Middle Guard up sticks and move forward, abandoning the village to the locals. The Old Guard move to support.


The Russian left flanking cavalry attack in full swing. But some move across into the centre...


Roll on a few hours….fast forward….the Poles still hold the farm but Austrian heavy cavalry have completed their encirclement and lie to their rear. This made the ability of the Poles to pass their "brigade test" all the more difficult. (with enemy lying to the rear.) But some French light cavalry (just visible at the top of the picture) also posed a threat to the rear of the Hungarians.


The French assault of the central hill was messy. Some units moving forwards, others backwards. Cuirassiers have pinned down several Russian battalions while the Middle Guard start to take the hill but suffer severe casualties in the process. Russian Guard battalions seen on the right (yellow flag) begin a counter attack and start to hit the Old Guard hard. Indeed one Russian line battalion (with both rear and flank support) managed to rout a Middle Guard battalion which was relying on its superior quality.


While some Russian cavalry went the long way round, others (Loubny, Soum and Guard Hussars with Cossacks swing in and pose a threat to the success of the Old Guard assault on the central hill. The French dragoons counter this threat but are destroyed in the process. (hence no picture….but they were there….all three regiments!) Elements of the Young Guard in the redoubt. Perhaps the foot battery should have stayed put and covered that approach instead of limbering up and moving to the right.


Austrian cavalry threat to the rear.(4 regts and 2 HA batteries) Post match it was agreed that one brigade of cavalry could have performed this role instead of the two that undertook it. The overall effect would have been the same. Had one of these heavy Austrian cavalry brigades been in the centre the French assault on the central hill might never have happened.


The Austro-Hungarian infantry made two unsuccessful attempts to take one of the farm buildings and were thrown back with heavy losses, despite these larger battalions having a slight advantage in the melee.

Overall it was agreed that the Allies had won a marginal victory. Denuding the Allied centre of any cavalry cover allowed the French to take the initiative with their own unexpected attack. Neither objective was taken though Russian Guard units had begun to enter the deserted village (too many gaps to plug) by the end. The French, however, were encircled and the Young Guard brigade on the ridge line, with no cavalry support, would have surrendered. The Poles ditto. In hindsight the French plan was bold and might have had a better chance of success if the supporting dragoons were already in place to support the Old Guard's attack o the hill, rather than starting on the extreme flank and having to fend off the Russian cavalry. Russian Guard infantry pinned down in squares would have been mincemeat for the advancing Old Guard infantry and supporting guns. But the Russian Guard were free to attack in numbers and the Old Guard were too thinly spread to fend them off.

Russian infantry casualties were double that of the French though the French cavalry were either all committed or destroyed. Russian cavalry losses were light.

Thursday 8 October 2015

Art Miniaturen

Art Miniaturen are arguably the best manufacturer of 20mm Napoleonics. A decision to buy up large quantities of infantry was not taken lightly bearing in mind the cost but the variation of poses and quality of the sculpts make Art M head and shoulders above the rest and make such a purchase a sound investment.

The latest figures to be painted are a brigade of Hungarian line infantry and another of grenadiers (the blue breeches contrast well with the yellow facings). 400 figures in total,  and some Pavlograd Russian Hussars. The turquoise makes these chaps stand out. A Cossack aide to the command stand. Plus of course those essential movement trays!

Some Grodno Russian Hussars (dark blue/light blue facings) have also been finished. Photo to come. Austrian infantry and French infantry yet to come. Introducing limbers will also be a heavy investment but important for the look of the table top. Franznap will be providing the French limbers and Art M the Prussian/Austrian ones.


Monday 24 August 2015

The outcome….

Objectives: The hill on the Russian right flank, the village/church (had to take and hold two out the three buildings) and the farm (gain both buildings)

Deployment: FRENCH: It was decided to give the task of taking and holding the hill to the Young Guard brigade. They would have a couple of cavalry brigades to support this action. The Middle Guard would try and attack the village but bearing in mind the village was virtually already in Allied hands, this was going to be a tough call. The centre open ground would be cavalry dominated with one infantry brigade opposite the farm and the weak Westphalian brigade to hold the right flank.

Their idea: Was to take the hill and dominate the centre so be able to take the village in due course. It was not anticipated that taking the farm was a realistic option.

RUSSIAN/AUSTRIAN: The game plan here was to rush the hill with a combination of one Russian line infantry brigade (who were already in the process of crossing the stream as the game began) supported by Cossacks on their right and a Russian line Cuirassier brigade supporting their left. The Russian Guard were located in the village. Massed cavalry in the centre/open ground. One Russian brigade was tasked with defending the one farm building within easy reach.

Their idea: smash and grab the hill and launch a massed cavalry assault in the centre.


 The Astrakhan Cuirassiers (yellow) can be just seen in the process of destroying a French Cuirassier regiment and then careered on into the line lancers behind, who had already become disordered by the this stage. Both the Novgorod and Astrakhan Cuirassiers were to be one of the few Allied cavalry regiments to see action and their early success enabled Russian infantry in taking the hill.
 The Cossacks (supporting the hill attack) refused to cross the stream on move one (failed brigade test) which enabled the French 1st and 2nd Hussars to get in close for an attack.
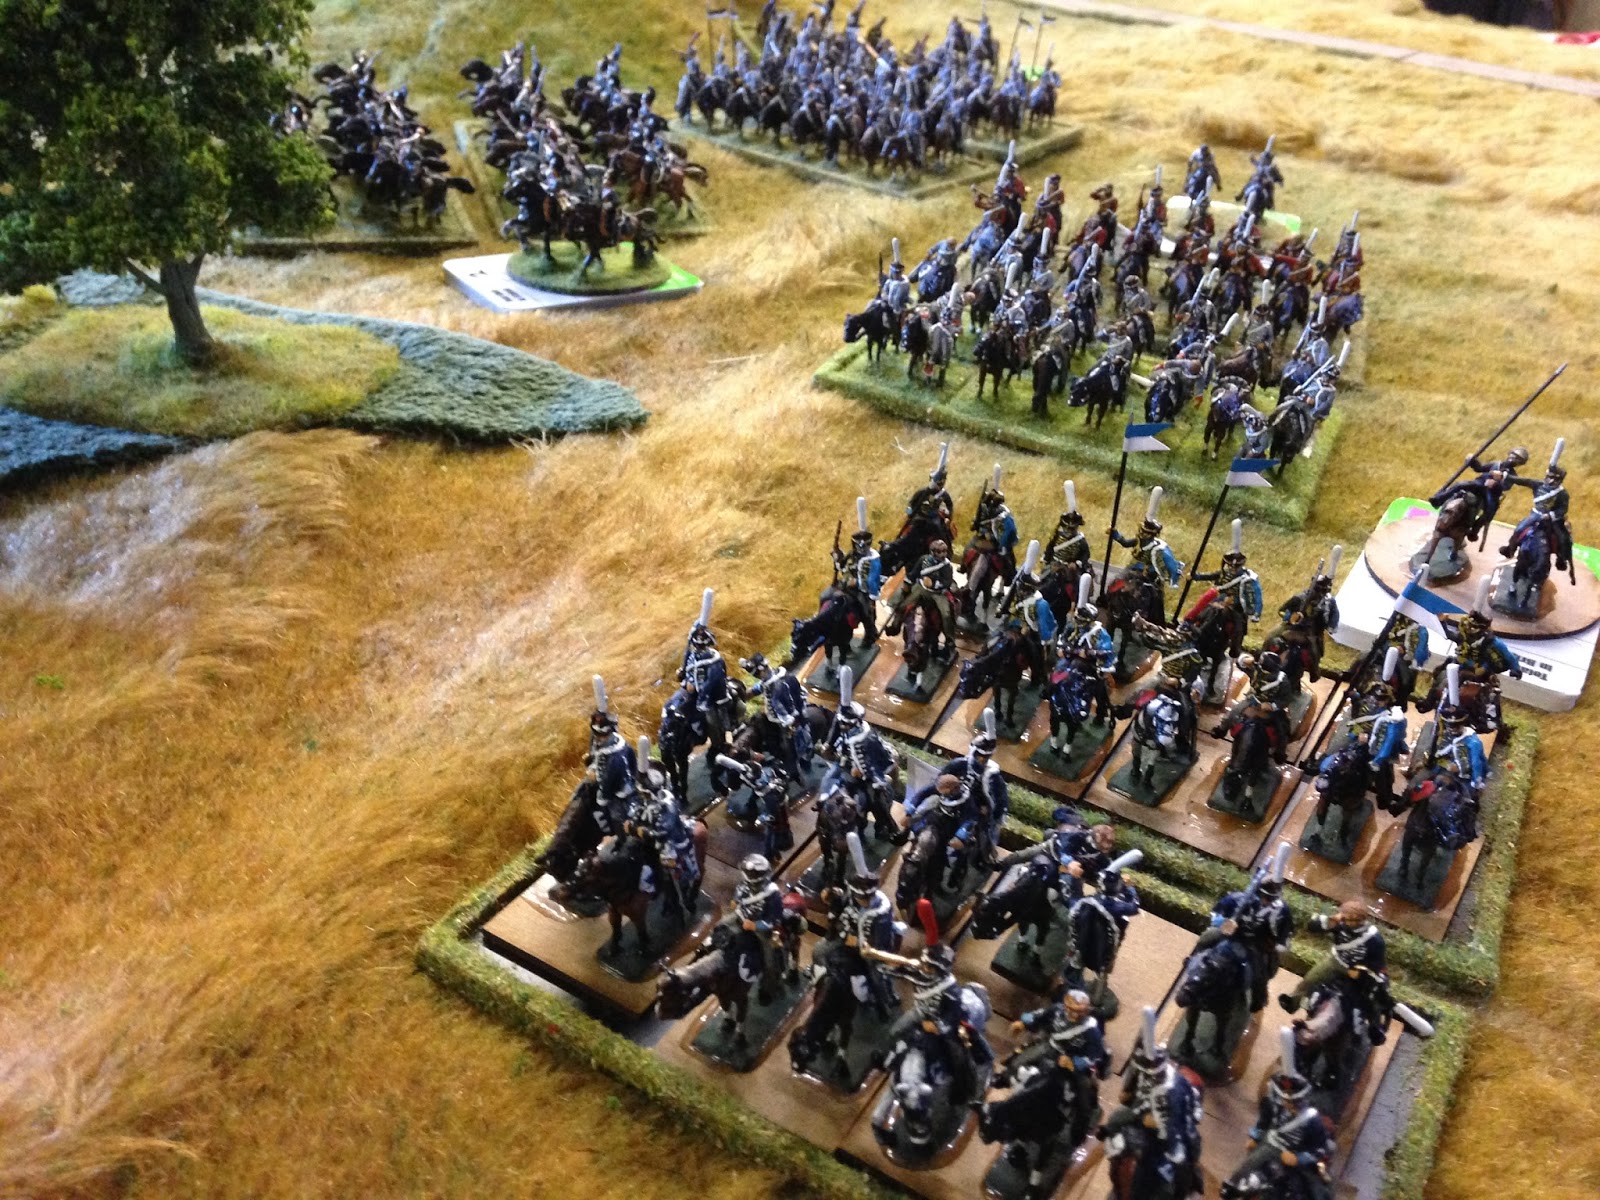
 Young Guard approaching the hill with skirmishers out in front. The Young Guard became disordered as they exited a wood on the way up the hill which delayed their ability to seize the crest before the Russian infantry. (can be seen in far distance)
 French Middle Guard take up a defensive position behind the wall of the graveyard, adjacent to the village. Skirmishers play cat and mouse in the graveyard.
 The 2nd and 6th (I think) French dragoons were held back in the centre until the final moments of the game. This unit was argued over as to which player actually had command over it. When they did attack they suffered badly from artillery fire though did succeed in halting the delayed Allied cavalry assault in the centre.
 A French brigade moves across the cornfields to take the farmhouse, held by Russian units. Cuirassiers move up in support. This heavy cavalry brigade wanted to charge across the cornfields but only when we looked into the rules more thoroughly we noted that cavalry could not jump walls or a hedge unless there was a wide enough gap or a gate. They pulled back as a result. Two horse artillery batteries can be seen firing at the Russians on the far side of the wall. Casualties were slight however. A French light infantry battalion attempted to storm the farmhouse only to be thrown back and destroyed in the resultant melee. No further attempt was ever made to try and take this building from the Russian jagers defending it.
 The French 9th Cavalry brigade (Polish lancers and Krakus Cossacks) supported by French dragoons decided to launch an attack down the road which caught the Russians by surprise. The Russian foot battery could not turn to fire and was unsupported by infantry. Russian dragoons rushing across from the middle would be unable to save this battery.
 The Austrian Cuirassiers, sheltering behind a ridge line, on the far left Allied flank were effectively pinned down by the Westphalian foot battery guarding the French right. A hedge prevented a quick attack though the presence of two gates should have enabled this unit to retire and re-deploy down the road.
 Russian dragoons moving to the Allied left to prevent a French breakthrough.
 Allied cavalry in the centre (a 2nd Austrian Cuirassier brigade and Russian Guard Hussars and Soum Hussars), taking cover behind the hill. The presence of two French foot batteries effectively quashed the Allied desire to attack full on in the centre. The hills (whilst providing cover) also prevented the allied cavalry moving quickly forward.
 Russian Guard infantry and artillery protect the village and church.


As the sun began to go down (quite literally) the outcome became clearer. The French assault down the road and taking out the Russian battery was successful but these units beat a hasty retreat the moment the Russian Dragoons came into view. The Russian infantry brigade commander was also killed and the loss of his +1 (became zero) and the loss of the battery (-1) in the brigade test began to tell on the Russian ability to hold this sector. The Russian jager battalion holding the farmhouse were finally forced to retire as a result of a failed brigade test. An attempt to re-take it also failed. The weak Westphalian brigade was never truly tested and held that flank all game. The battery never fired a shot.
 In the end the Allies did sally forward in the centre with two brigades of cavalry, sustained losses and retired. The French Cuirassiers and Dragoons began their final assault in the centre, but the Allies were already in full retreat.
 French infantry, having taking the farmhouse, watch Russian infantry in retreat.
 The stand off between the Middle Guard and the Russian Guard lasted all game. Some battalions of Middle Guard saw action, but most did not.
 The final flurry of action saw some Russian units making a dash for the hill, which was already in Young Guard hands supported by the 10th Hussars.

                                     
 Russian units making their dash from the village.
 Russian Dragoons in full retreat. None of these three regiments saw any action, but successfully prevented a French breakthrough after the Russian foot battery was destroyed.
 Russian and Austrian cavalry in full retreat. The Loubny Hussars in blue did not see action either and often failed their brigade test to move when requested. Odd as the Loubny Hussars had a fearsome reputation.

The final moments of the battle. The Westphalians can be seen in the foreground with the farmhouse in French hands. The village and church is in the far distance, with the hill just out of view.

 This picture illustrates the problem the Austrian cavalry had on the extreme left. Hedges to the front, guarded by the Westphalian battery and another hedge to its right. This is the kind of unit some would have wished to belong to: at the battle in mind and body…..but….
 Allied units falling back.
 Russian units launching their second and final (and failed) assault on the hill.

Overall a good game, enjoyed by all that attended. There might be a further game this year but looking doubtful.